Archive for the 'Recipes' Category

Banana Avocado Baby Puree

The Dos Equis Man is now officially scared of Maurice Gamanho

I don’t always make my own baby food, but when I do…my kid usually spits it out. (Sorry if you have no idea why that silver-haired stallion is pictured above. Try googling “Dos Equis The Most Interesting Man in the World”.)

It’s got to be a texture thing. I mean, freshly steamed peas just have to taste better than “canned” peas, right? But, no matter how long I leave my processor spinning, I just can not achieve that perfectly smooth texture you squeeze out of those nifty little baby food pouches.

DSC_5929

This banana and avocado mash-up in an exception. Lennon will generally hang her mouth open and squeal for more. I love this because avocados and bananas are extremely nutritious and sometimes I have nothing planned for the random ripe avocado sitting on my counter and this is the perfect solution.

DSC_5925

Banana Avocado Baby Puree

1 Ripe avocado, pitted
1 Ripe banana, peeled
juice from 1/2 small lemon (about 1 Tbsp)
2-3 Tbsp runny prepared baby cereal (about 1 dry scoop)

Scoop out avocado flesh into small mixing bowl. Add banana, lemon juice and cereal. With a potato masher or a fork, mash ingredients until smooth. At this stage there will still be random lumps. If your baby is used to eating lumpier foods, you can stop here. If your baby prefers smoother textures like mine, force mixture through a fine mesh sieve.

This will make approximately two 4 ounce servings. I’ve had luck keeping the second serving for the next day in a small 4 ounce airtight container. The lemon juice helps prevent oxidation though you won’t avoid it entirely. If it bothers you, just skim off the brown layer from the top before feeding the leftovers to your baby. I do not recommend heating this puree. Serve it room temperature or cold.

Creamy Avocado Pasta

This is a meal that I would be eager to serve to my family and Jeff’s family without telling them exactly what it is. See, I’d be dead certain they’d love it, but they would be dead set against trying it if they knew what was in it. Both of us come from families with less adventurous palates who would likely be repulsed by the pureeing of an avocado tossed with pasta. I used to be that way not too long ago. Let me tell you, life’s much better on the other side.

This dish is basically just pasta coated with smooth guacamole. It’s crazy healthy, tastes fantastic, and requires only the amount of time it takes to boil pasta.

I licked the bowl and you may just do it, too.

Creamy Avocado Pasta

As Seen On: Total Food Porn (my friend Corrina’s amusing blog. Check it out!)
Originally From: In Good Taste

1 medium sized ripe Avocado, pitted
1/2 lemon, juiced
2 garlic cloves
1/2 teaspoons kosher salt, or to taste
2 Tbsp. grated Parmesan cheese, plus much more for garnish (optional for vegan)
1/4 cup fresh basil
2 tablespoons extra virgin olive oil
2 servings of your choice of pasta, about 1/3 lb. (I’ve used both whole wheat and regular, I prefer regular)

Cook spaghetti according to the directions on the package. Drain almost completely, but leave about 1/4 cup pasta water for the noodles to mingle in. Meanwhile, place the garlic, lemon juice, and olive oil into a food processor. and blend until smooth. Next, add the avocado, basil, salt and cheese process until the mixture has a smooth and creamy consistency. Toss pasta with sauce and garnish with extra basil and Parmesan cheese and freshly ground black pepper.

Clementine Cake

DSC06495

Clementines always sound good to me when I don’t have any in my fridge. The second I buy a bag, I no longer want any.

You can occasionally find a place that sells clementines individually instead of forcing you to commit to 3 or 4 pounds of them like most supermarkets. This is good except you run the risk of choosing all “bad clementines”. You know the kind. They’re dry and taste kind of off. They’re slightly bitter and maybe a little sour. Not the candy-sweet and juicy treat you were expecting. So it’s good to have a bag full of second chances.

It never fails, however, that I have half a bag of clementines racing toward the cusp of rotten and not enough mouths to shove them into. Marlo likes the idea of clementines, but the so-called “stringy things” she meticulously has to remove from each wedge before eating it can be cumbersome for a three year old, rightfully so. As you can imagine, I practically ran into the kitchen to make this cake the second I stumbled across this recipe. It cleaned up a good half dozen of the little citrus boogers for me.

This cake turned out to be one of my favorite little desserts I’ve made for a while. It’s mildly sweet, but satisfying. The crumb is dense, smooth and moist. It’s the perfect thing to serve your friend alongside a cup of afternoon tea.

Clementine Cake
Adapted from Mache Magazine

1 1/2 cups all-purpose flour
2 tsp. baking powder
1/2 tsp. salt
1/8 tsp. ground cloves (I made this a generous 1/8, as I love cloves with orange)
1 cup plain yogurt (I used plain whole milk, the recipe called for 2% Greek – use what you have)
1 cup sugar
3 large eggs, beaten
1 Tbsp. clemtine zest (from about 2 large clementines)
1 tsp. vanilla extract
1/2 cup flavorless oil (I used grape seed oil)

Glaze
1/3 cup clementine juice (I needed about 6 or 7 clementines)
1/3 cup sugar

1. Preheat oven to 350 degrees. Grease 10X5 loaf pan and line the bottom with parchment paper.
2. Whisk together flour, baking powder, cloves and salt in a medium bowl. In a large bowl whisk together sugar, yogurt, eggs, zest, and vanilla. Slowly add oil to wet mixture.
3. Using a spatula, carefully fold dry ingredients into wet ingredients. The batter will be a little lumpy.
4. Pour batter into prepared pan and sprinkle top with sliced almonds. Gently press the almonds into the batter a little. Bake for 45-50 minutes, or until a toothpick inserted into the center and removed is clean.
5. Let cake cool in pan for 15 minutes, then remove the cake while it’s still warm and place on a wire cooling rack over a sheet of wax paper.
6. While cake is cooling in the pan, warm juice in a small saucepan. Stir in sugar until completely dissolved. Remove from heat.
7. With a long skewer, poke deep holes into the cake from the top all over the place. Then slowly pour the glaze over the cake while the cake is still warm. (The glaze will seep into the holes you poked adding moisture and flavor to the inside as well as the outside.)
8. Allow to cool before serving.

Chocolate Drizzled Coconut-Almond Macaroons

DSC06449

These cookies do not require any of the following:

  • Butter
  • A stand mixer
  • Even a sliver of baking expertise

Yet they  look fancy, taste great and only appear like you slaved in the kitchen.

I made these for the first time when I was 14 years old and fell in love with them. I really don’t even remember where the recipe came from, but I’d like to give a probable shout out to Cooking Light magazine. If you’re not familiar with coconut macaroons, they really aren’t a typical cookie. You have to really like coconut and the flavor of almond extract. They’re meaty and chewy in texture, and the almonds in this recipe give them a much needed sporadic crunch. If any of that sounds good to you (why wouldn’t it?), give them a shot.

Have a nice weekend!

Chocolate Drizzled Coconut-Almond Macaroons

2 2/3 cup sweetened shredded coconut
2/3 cup sugar
1/4 cup all-purpose flour
4 large egg whites
1 cup sliced almonds
1 tsp. vanilla extract
1 tsp. almond extract
8 oz. bittersweet or semi-sweet chocolate
1/4 cup sliced almonds pulverized for garnish (optional)

Preheat oven to 325 degrees. Line two baking sheets with parchment paper. Combine all ingredients except for the chocolate in a bowl. Form balls from rounded tablespoonfuls and place 2 inches apart on prepared baking sheets. Bake 20-25 minutes, rotating half-way if you have uneven heat in your oven like I do, until edges of cookies are a light golden brown. Remove from pans while hot and allow to cool.

Meanwhile, melt chocolate in a double boiler. If you don’t have a double boiler, make your own by nestling a heat safe bowl (glass or metal work great) over a sauce pot simmering with water. Once the chocolate is melted and smooth, remove from heat and allow to cool just slightly. You can dip half of your macaroons in the chocolate, or to drizzle, fill a plastic sandwich bag with chocolate and snip off the tip of one of the bottom corners (be ready to drizzle immediately, as the chocolate will be-a-flowin’) and quickly zig zag over the baked and cooled macaroons. Finish by sprinkling with crushed almonds.

Chocolate Cut-Out Cookies

Last year, for Marlo’s preschool Valentine exchange I made cute little fish cards made out of paper hearts. There were only 8 or 9 kids in her class then, and crafting those was not much of a commitment.

This year is an entirely different story. She goes to school five days a week and is in two separate classes. She has over 20 classmates and 4 teachers. Making two dozen cards would take hours. Double that time if I can conjure up some sort of patience to include Marlo in on the crafting. And let’s face it, the valentines will wind up in the trash after the period of politely putting up with it around the house ends. Here, that’s about a day. Maybe two days.

Instead, I decided to make treats. If I’m going to slave for a few hours, I’d rather make something that will actually be consumed. I was stumped as to what exactly to make when Ree, The Pioneer Woman, showed up on my television last Saturday morning with this recipe for chocolate cookies. Thanks Ree.

DSC06311

On the Food Network show, she cut her cookies into rectangles and dipped them in melted chocolate and almond bark and then into various crushed up candy toppings. I didn’t have any of that lying around, but I did have white baking chips and pink sprinkles.

DSC06314

A few left over for the adults got dipped into this tasty espresso sugar I picked up from the Salt Table in Savannah, Georgia.

DSC06315

These cookies resemble the texture of gingerbread cookies – soft and crumbly. The flavor itself is not going to knock your socks off, it’s a very mild chocolate flavor but it is perfect for jazzing up without creating a treat that’s a little too rich for a kid to enjoy. The dough was a breeze to roll out and manipulate, and the cookies set up in the oven in less than 10 minutes.

DSC06316

This might be a good one to keep in your back pocket.

Chocolate Cut-Out Cookies
Adapted from Food Network

2 sticks unsalted butter, softened
1 cup powdered sugar
1 whole egg
2 teaspoons vanilla extract
2 1/2 cups all-purpose flour
1/2 cup unsweetened cocoa powder
1 teaspoon salt
1 bag white baking chips
pink sanding sugar

Cream the butter with the powdered sugar. Add the egg and vanilla and mix to combine. Add the flour, cocoa powder and salt, and mix together until the dough comes together. Place plastic wrap on the surface of the dough and refrigerate for 2 hours.

Preheat the oven to 375 degrees F. Line baking sheets with baking mats or parchment.

Roll out the cookie dough and cut out the cookies using a cookie cutter, re-rolling the scraps in order to use as much of the dough as possible. Place the cookies onto the prepared baking sheets. Bake for 7 to 9 minutes, in batches if necessary, being careful not to burn. Cookies will remain the same general size and shape after they bake.

Melt white baking chips in a heat proof bowl nestled over a pot of simmering water. Dip cooled cookies into melted chips and immediately dunk in bowl with pink sand sugar. Set on cooling rack until hardened.

Cacio e Pepe

DSC06273

Or “Anthony Bourdain Pasta”, as we call it in our house. Why do we call it that? We first became aquainted with this simple idea of spaghetti, cheese and pepper as a delicious main dish last year while watching the Rome episode of No Reservations. The segment can be seen in the video below beginning at 2:50 (or just watch the whole thing, you won’t be sorry).

Tony makes it seem simple enough – just pasta, pasta water, butter, cheese and pepper, but the coward in me needed a recipe or some sort of proportional guide. After Googling it, I was pleased to see that everyone’s favorite food blog, Smitten Kitchen, had me covered.

I’ve made this dish, following SK’s recipe, probably 20 times. It is one of Jeff’s favorite meals and it is, by far, Marlo’s favorite. It’s my go-to meal when I’m getting low on fresh food, and this on the dinner table generally foreshadows a trip to the store. I always have the ingredients around, and I bet you do, too. Since there is really only three ingredients worth acknowledging, go ahead and try to make them the best quality you can accomplish. Spend the extra 80 cents to buy the good pasta. Go ahead and splurge and spend a dollar more on the cheese that says “Pecorino Romano” not just “Romano”. Break the bank. I dare you. And unless you’ve got some crazy arthritis, crack your pepper fresh, don’t you dare shake it out of a tin box.

I always serve it with something green, but if I had no shame I would just fill a giant bowl to the brim, call it supper and be happy (very happy). Too bad about that shame stuff.

Cacio e Pepe
Adapted from Smitten Kitchen

1/4 cup olive oil
1 pound dried spaghetti
2 tablespoons butter
4 ounces Pecorino Romano cheese, finely grated *
1 1/2 teaspoon finely ground black pepper
Salt (optional)

Cook spaghetti in well-salted water according to package directions. Drain spaghetti, reserving 1 1/2 cups of pasta cooking water.

Dry out your pot, then heat the olive oil over high heat until almost smoking. Add drained spaghetti and 1 cup of reserved pasta water (careful here, it will spatter ferociously).

Add butter, 3 ounces cheese and ground pepper and toss together with tongs. Taste, adding more pasta water, cheese, pepper or salt to taste.

Serve immediately, sprinkling with reserved cheese and and more black pepper.

* I’ll be honest, I don’t really measure the cheese. Just throw it in and quit when it looks “cheesy enough” for me. No reason why you can’t do the same.

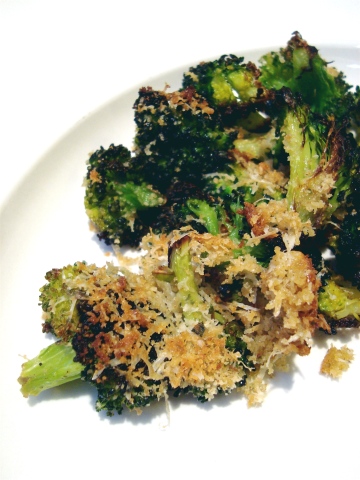
Crunchy Roasted Broccoli

Remember back in the 90’s when it was commonly known that President George H.W. Bush hated broccoli? Passionately hated broccoli. Probably had all florets banned from within the White House perimeter. Even as a child I remember thinking how weird that was. Our president, Leader of the Free World, wouldn’t eat a common vegetable and wasn’t ashamed of it. Maybe this is why he lost the election. His kryptonite was delicious, cancer-fighting green goodness, well that, and the guy who beat him could play the saxophone.

Maybe Mama Bush never prepared broccoli to be crispy on the outside, tender on the inside and covered in a cheesy crunchy crust. Surely that would have warmed little George’s feelings toward the vegetable. Luckily, broccoli is a welcome addition to any plate in our family. Steamed, roasted, sautéed, or raw, Jeff, Marlo and I all love our broccoli any way, but this might be our favorite recipe.

Crunchy Roasted Broccoli
Adapted from Good Housekeeping

1 lb. broccoli florets cut into 2 inch chunks
2 Tbsp. plus 2 tsp. olive oil, divided
Salt and black pepper
1/4 cup grated Parmesan or Romano cheese
1/4 cup seasoned bread crumbs or Panko

Preheat oven to 450 degrees. Line rimmed baking sheet with aluminum foil.

In large bowl combine broccoli, 2 tablespoons of olive oil, and salt and pepper to taste. Stir to evenly coat.

Stir together cheese, bread crumbs and 2 teaspoons of olive oil in a small bowl.

Spread broccoli on baking sheet and roast in the oven for 15 minutes, tossing once half-way though. Remove pan from oven, spread cheese and bread crumb mixture evenly over the top of the broccoli. Return broccoli to oven and roast for 5 more minutes.


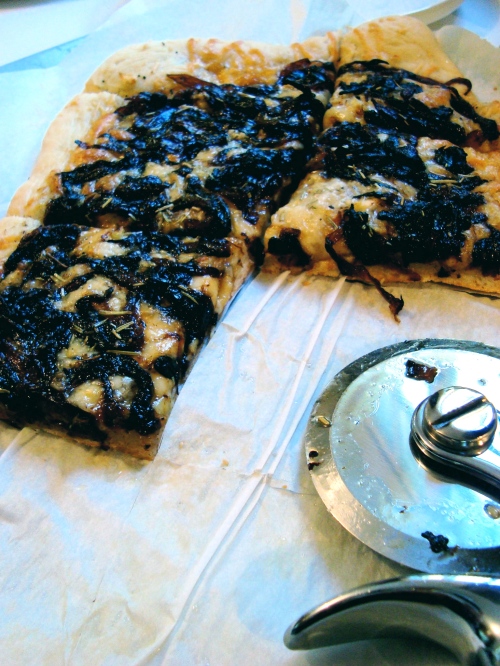
Caramelized Onion Pizza

This is snobby pizza, but don’t get me wrong here – I am not a pizza snob. Sure, I’ve lived in Chicago and had some of the absolute best pizza in the country, but I’ll still gladly polish off a pie from Pizza Hut. I freaking love pizza.

Something I’m not that crazy about – pizza sauce. I hate hot red sauce oozing out from the skin of cheese on my pizza. Ever since I was a kid I preferred pretty much no red sauce on my pizza. Then, one day when I grew up and left the cornfields, I realized there is a whole style of pizza that purposefully has no sauce. My life got a lot better that day, a whole lot better.

This is one of those pizzas. Some places call them “White Pizzas”, and I’ve also seen them called “Olive Oil Pizzas”, whatever you please, there is no red sauce. It would probably be opposite day if you ever saw a recipe on this blog for a pizza with red sauce.

This pizza is light, because there’s no meat (duh), but actually pretty rich and definitely sophisticated. Eat it!

Caramelized Onion Pizza

2 medium/large onions (I recommend sweet or red), sliced thin
3 Tbsp. butter
1 Tbsp. olive oil
1/4 tsp. dried thyme
splash of white wine

Pizza Dough (whatever you like – store bought, Boboli, homemade. I use Trader Joe’s 99 cent pizza dough.)
2-3 Tbsp. Olive Oil
1 cup shredded mozzarella*
1 cup shredded fontina*
1/3 cup shredded asiago*
*OR you can just use the best bagged pizza cheese ever from Trader Joes – a mix of fontina, mozzarella, provolone and asiago
2-3 sprigs of fresh rosemary, leaves removed from stems, stems discarded and leaves roughly chopped
2 large garlic cloves chopped

Preheat your oven according to your dough’s specifications. This is generally around 400 degrees.

1. To caramelize the onions, melt butter with olive oil over medium heat in large pan. Add onions and season with a few pinches of salt and the dried thyme. Cover and revisit often to stir and ensure that the onions are browning not burning. You may need to lower the heat and that’s okay. Onions should reduce in volume by half, become thick and syrupy like marmalade, and be a rich dark brown color. This can take about 30 minutes.
2. Once the onions are perfectly caramelized, add a nice glug of white wine to the pan and scrape up any browned bits. Simmer the wine for a few minutes until it’s reduced to a syrupy consistency. This step may be completely unnecessary and optional. I just like doing it because it cleans my pan.
3. Roll out pizza dough on sheet of parchment paper and brush all over with olive oil. Sprinkle with salt.
4. Sprinkle cheese over dough leaving about a 1/2 inch of dough on the outside edge for a crust.
5. Using 2 forks, spread caramelized onions evenly over the cheese covered dough.
6. Evenly sprinkle rosemary and garlic over onions.
7 . Bake pizza on parchment paper, directly on the rack according to the crust directions. Anywhere from 10-16 minutes.
8. Remove from oven and let rest for 5 minutes before cutting.

Lemon Garlic Pasta with Grape Tomatoes and Zucchini

DSC03866

I generally like being told what to do.

I may sneer at you after you boss me around, but secretly, I’m relieved. Why? Because I am, for lack of a better and more pc word, a pussy. I may know the best way to tackle something. It probably is even better than your way. But, I don’t have the confidence to go it alone, unless we’re playing Euchre.  So give me your plans, your ideas, your set of directions and even if I think they’re terrible, I follow through with what you say anyway. What a terrible quality to have, huh?

What’s so ridiculous about all of this, is when I do actually step out on a limb and skip what you say and do what I say instead, I usually have had pretty redeeming results. Particularly with recipes. Especially with this one.

I tried finding a recipe a few days ago for a pasta with tomatoes and zucchini. And out of everything I found, I was either several ingredients short, or it sounded boring. So I decided, what the hell, I’ll just use what I’ve got and make something up.

This was perfect and exactly what I wanted. A lot of flavor with a little bit of heat. The name is just too long.

Lemon Garlic Pasta with Grape Tomatoes and Zucchini

12 oz. Penne pasta
3 Tbsp. olive oil
1 small onion, sliced thin
3 cloves of garlic chopped
1/4 tsp. crushed red pepper flakes
2 small zucchini, cut in half and sliced into thin half moons
1 pint grape tomatoes, rinsed
1/2 tsp. dried Herbes de Provence
zest and juice of 1 lemon
1/3 cup of shredded Asiago cheese, plus more for sprinkling at table
salt and pepper to season

1. Set large pot of water over high heat to boil. Prepare pasta according to package directions. Drain and return pasta to pot.
2. In large saute pan, heat olive oil over medium-high heat.
3. Add onions. Season with salt and saute until softened.
4. Reduce heat to medium and add garlic and red pepper flakes. Saute until fragrant, about 30 seconds.
5. Stir zucchini into pan and season well with salt and pepper. Saute for a few minutes until they begin to soften.
6. Add tomatoes and Herbes de Provence to pan and stir. Heat until tomatoes begin to pucker, about 5-10 minutes. Remove pan from heat and add contents to pot with pasta.
7. Add lemon zest and juice to the pot and season with salt and pepper to your taste. Toss well.
8. Transfer to large serving bowl or platter. Top with Asiago cheese.

Broccoli Pesto Pasta

DSC03462

Marlo loves this.

No, I’m not kidding.

Let me be clear. The noodles are covered in green stuff and she can’t get it in her mouth fast enough.

When it’s all gone she asks for more while still chewing her last bite.

It’s good, good for you and unbelievably simple.

But then again you expect that here, right?

Broccoli Pesto Pasta
Adapted from Good Housekeeping Family Vegetarian Cooking

12 oz. (just shy of the full pound box) spaghetti
16 oz. bag frozen broccoli florets
2 big garlic cloves, peeled
1 cup vegetable broth
1/4 cup grated Parmesan cheese
2 Tbsp. olive oil
1/4 tsp. salt
coarsely ground black pepper

1. Prepare pasta according to package directions. Drain.
2. Meanwhile, prepare broccoli according to package directions. I opt to microwave. Works great every time.
3. In food processor fitted with blade attachment, puree cooked broccoli, garlic, broth, cheese, olive oil and salt.
4. Mix pasta with broccoli pesto. This takes some time to get it evenly distributed.
5. Serve immediately with a generous grind of black pepper. Don’t skip the pepper.


Quantcast

Enter your email address to subscribe to this blog and receive notifications of new posts by email.

Join 62 other subscribers

Archives

Find an Old Post by Category